Hi girls, have you ever bought some hair weave sometimes? So do you sew in your weave by your stylist or yourself? Maybe some are do a DIY sew in your weave, if u don’t know how to do it yourself, keep reading, here are some steps on how to sew in your weave.
Prepare For Sew In
To get started, you will need a comb, some scissors, and clips. Plus c-curve needles, hair weaving thread, styling products and styling tools. Before you put your scalp and hair through the process of a weave, make sure they’re as strong as possible. Deep condition your hair. Make sure your hair is detangled to cut down on pulling once the braiding begins.
Step 1: Braid Your Natural Hair
First, you need to create two anchor braids at the front of your hair. This is where you part your hair, and so while you want the sections to be small. Then you’ll simply braid the rest of your hair, creating tracks. you can braid downward as it is easier and keeps the braids flat. Note that the process takes time, so don’t get discouraged if you feel it’s going slowly.
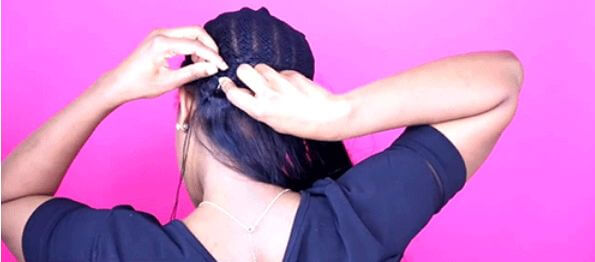
Step 2: Apply For A Wig Cap
Applying for a weave-in cap will make the sewing process easier and will also relieve tension on your hair and scalp. You can pick one up at your local beauty supply store or online.
Step 3: Sew In Your Weave
Now let’s start sewing your hair weave. First, you need to take your curve needle by going through the weft, then the cap, then the first braid of the back. This will create a connection between your scalp and the extension, and will especially pay off when you pull your hair + weave up in a high ponytail.

Step 4: Sewing from the Back to the Front
This tutorial uses four bundles of hair, To avoid shedding, the weft is folded over at the edges at the back, doubling it, as the weave is sewn in the opposite direction. It will help minimize shedding. At the front of your head, you’ll keep it as single weft though, to ensure it lays nice and flat. And just keep going. When you reach the end, at the front, you can secure it at that point and cut the extension off to begin a new row where you like.

Step 5: Blend the Hair You Left Out with Your New Weave
After you’ve sewn-in your extensions up to the anchor braids at the top of your head, you’re done. Cut the excess net around your hair part (from Step 2) and let your leave-out hair (from Step 1) out of their braids.
Finally, you can use flat iron to restyle your hair, I do suggest you can use heat protectant before you apply heat to your weave. So u did it! Congratulations.